 THE INSTRUMENT SERIES / 01
THE OFFICIAL USER GUIDE 2026
USER
MANUAL.
Drum synthesis. Sequencing. Sound design.
CHAPTER 00THE FIELD GUIDE
BEFORE YOUBEGIN.
DRUMR is built for turning an idea into a rhythm — and a rhythm into something unmistakably yours. Start here, then explore the instrument in detail.
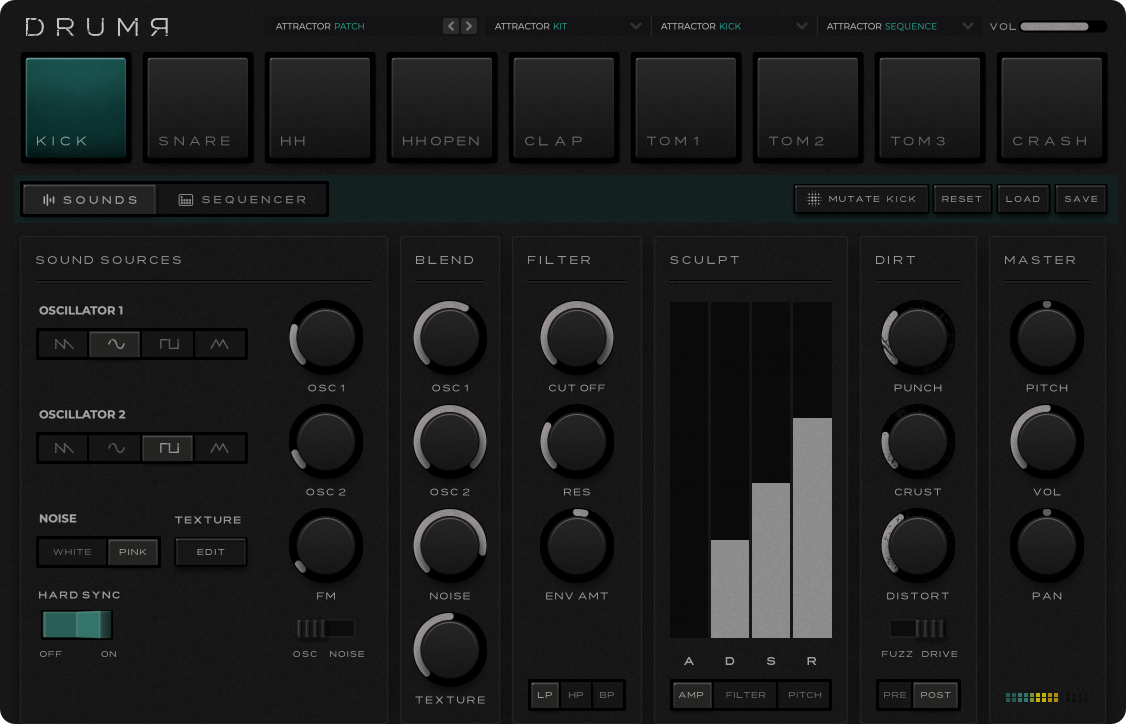
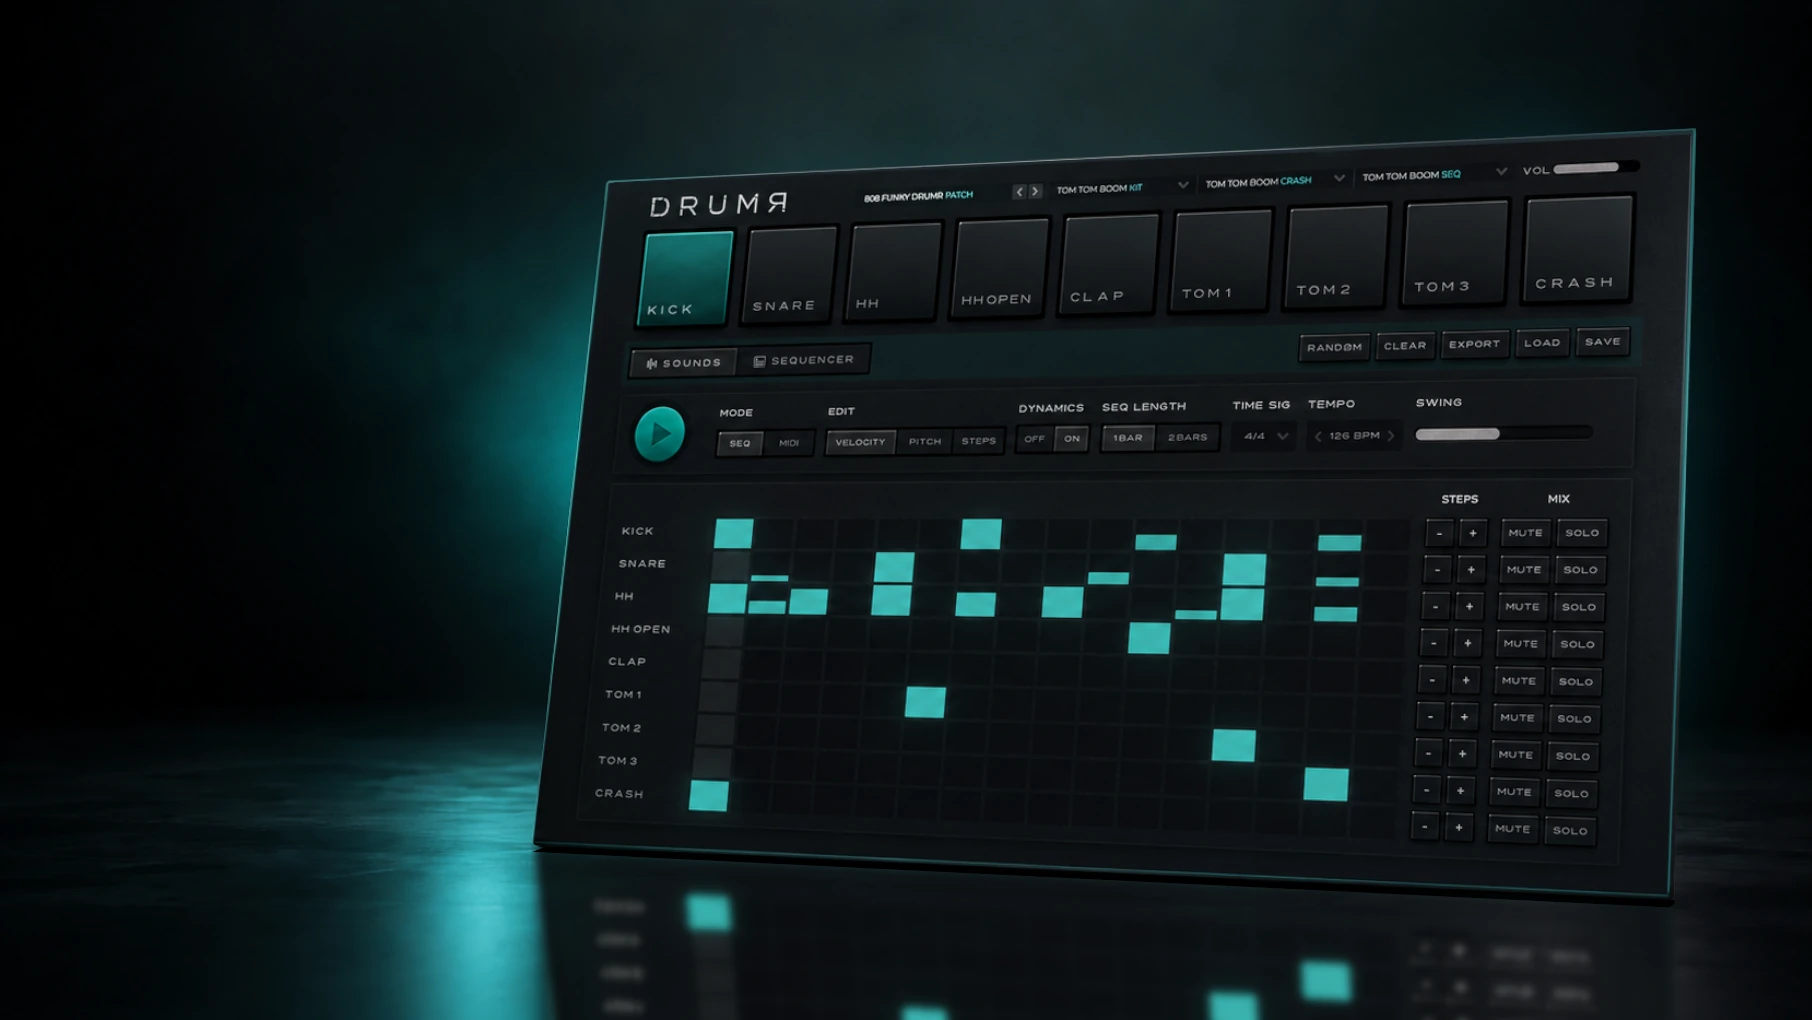
DRUMR is a nine-voice drum synthesizer and step sequencer by Scavenger Audio, available for macOS as an Audio Unit (AU), VST3 instrument or standalone application. Design kicks, snares, hi-hats, claps, toms and cymbals using oscillators, noise, filters and textures. Create expressive rhythms with separate step lengths for each drum voice, polyrhythms, swing, ratcheting, tuplets and step subdivisions. Save an entire composition, only the kit or individual drum voices, or just the sequence itself.
← Browse all Scavenger Audio manuals
Looking for specifications, pricing or downloads? Visit the DRUMR product page ↗
In this guide↗
Throughout the guide, capitalised words indicate labels in DRUMR’s interface. Some controls, options and playback behaviour depend on the selected voice, mode and DAW.
SCAVENGER AUDIO / THE DRUMR FIELD GUIDE
CHAPTER 01 / USER GUIDEGetting started
01Build a rhythm and shape your first drum sound in minutes.
Your first beat↗
Two ways to play↗
| SEQ mode | MIDI mode |
|---|---|
| DRUMR plays the internal step pattern when its transport or a moving host transport runs. | Incoming mapped MIDI notes trigger the nine drum voices; the internal pattern is not played. |
| Edit hits, timing, velocity, pitch and rolls in the grid. | Write notes in your DAW piano roll or play them using a MIDI controller. |
SCAVENGER AUDIO / THE DRUMR FIELD GUIDE
CHAPTER 02 / USER GUIDEFinding your way around
02The upper controls stay available while the lower section changes between sound design and sequencing.
1234The browser and voice pads↗
1 The top strip provides access to PATCH, KIT, the selected DRUM and SEQUENCE. Patch arrows move through patches; click the relevant browser field to browse and load assets of that type. A patch is the broadest snapshot: it combines the kit and sequence.
2 A row of nine pads represents Kick, Snare, HH, HH Open, Clap, Tom 1, Tom 2, Tom 3 and Crash. Clicking a pad selects that voice for editing and auditions it. The selected voice remains selected when you switch between SOUNDS and SEQUENCER.
Shared controls↗
| Control | What it does |
|---|---|
| SOUNDS / SEQUENCER | Switch the lower editor between voice sound-design controls and the pattern grid. |
| TIME/TEMPO | Set internal tempo from 40 to 240 BPM, unless the DAW is supplying timing. |
| TIME SIG | Choose 4/4, 3/4, 6/8, 2/4, 12/8, 5/4 or 7/8. |
| SEQ LENGTH | Choose a one-bar or two-bar pattern. |
| SWING | Shift selected rhythmic subdivisions away from straight timing. |
| DYNAMICS | Enable kit-level velocity shaping and open its settings. |
| Global VOL | Adjust DRUMR’s overall output level. |
| MUTATE / reset | Generate a variation of the selected voice, or restore its stored version. |
| RANDOM / CLEAR | Generate a pattern or clear the current bar as applicable. |
| EXPORT | Choose MIDI, one stereo WAV file, or individual WAV stems. |
SCAVENGER AUDIO / THE DRUMR FIELD GUIDE
CHAPTER 03 / THE SYNTHESIS ENGINEBUILD THE IMPACT.
03The Kick is the clearest introduction to DRUMR’s common sound engine. These controls recur across the other voices, with some voice-specific variations.
Oscillators, noise and texture.
Movement through filters and envelopes.
Punch, layered dirt and final balance.
Each drum combines synthesis sources, shaping envelopes and character processing. Start with the sources, balance them in BLEND, sculpt their frequency and movement, then finish with DIRT and MASTER. The diagrams below use the Kick as a reference; the following chapter explains the additional controls found on other voices.
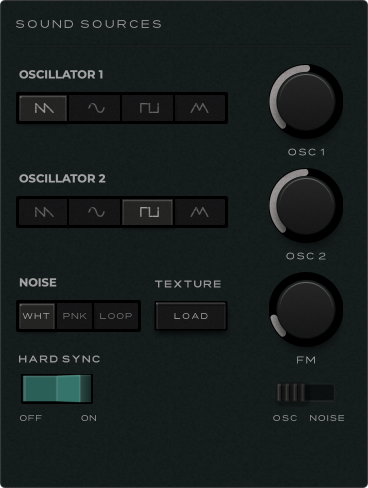
SOUND SOURCES — build the initial tone↗
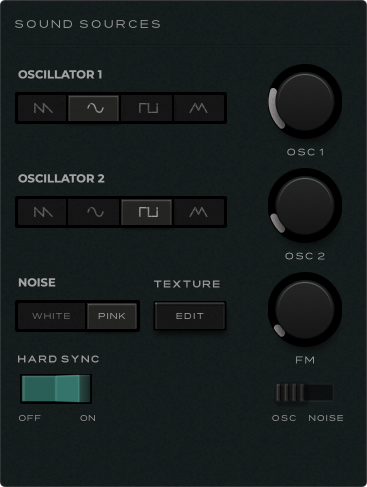
OSCILLATOR 1↗ Creates the main pitched body of the kick. Select SAW, SIN, SQR or TRI, then use OSC 1 to set its frequency. Sine produces a smooth sub-bass foundation; triangle adds gentle harmonic detail; square and saw provide progressively richer, harder-edged starting points.
OSCILLATOR 2↗ Adds a second pitched layer or acts as the modulation source for oscillator FM. Its waveform and frequency are independent of OSC 1. Close tuning can add thickness, while contrasting frequencies make the sound more complex or metallic. OSC 2 still influences FM when its direct BLEND level is low.
NOISE↗ Choose WHITE for a brighter, sharper attack or PINK for a softer, darker character. Noise can help a deep kick cut through a dense mix without requiring a louder low-frequency body.
TEXTURE↗ Opens the browser for recorded audio textures. A loaded texture becomes another source in the synthesis engine and can be shaped using the same filters and envelopes. The button changes from LOAD to EDIT after a texture has been selected.
HARD SYNC↗ When ON, OSC 2’s phase restarts as OSC 1 completes a waveform cycle. This introduces additional harmonics and can make a kick feel harder or more synthetic, particularly when the oscillators use different pitches.
FM↗ Controls frequency-modulation depth. Use the OSC / NOISE selector beneath the knob to choose the source being edited. OSC uses Oscillator 2 to modulate Oscillator 1; NOISE uses noise-based modulation for rougher, more irregular tones. Their amounts are retained separately, so you can switch sources without losing their settings.
OSC / NOISE↗ Switches the FM control between oscillator FM and noise FM. It selects the amount you are editing; it does not simply mute the other modulation path. This is useful for combining pitched complexity with gritty, noise-driven attack.
FIG 03Kick SOUND SOURCES: waveforms, noise, texture, synchronisation and two FM sources.
BLEND — set the balance of sources↗
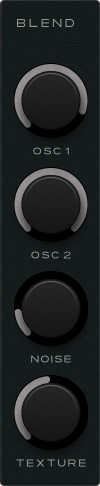
OSC 1↗ Sets how much of the first oscillator is heard in the kick’s source mix. Raise it for a stronger pitched foundation; reduce it to give the other sources more space.
OSC 2↗ Sets the direct level of the second oscillator. It can reinforce the body or add a contrasting tone, while its oscillator-FM role remains independent of this direct blend level.
NOISE↗ Balances noise against the pitched oscillators. A little noise adds articulation; higher settings lead to gritty, industrial or deliberately hissy attacks.
TEXTURE↗ Sets the contribution of a loaded sample texture. Low values add subtle recorded detail; high values make the texture a dominant part of the hit. This level control is relevant after loading a texture.
FIG 04BLEND: independently balance the synthesized and recorded source layers.
FILTER — shape tone and motion↗
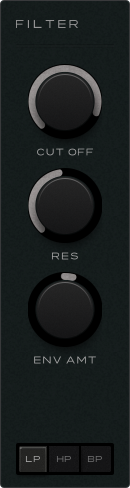
CUT OFF↗ Sets the filter cutoff frequency. In LP mode, lowering it reduces upper harmonics for a rounder kick; HP removes more bass as cutoff rises; BP focuses the sound on a narrower frequency region.
RES↗ Emphasises frequencies near the cutoff point. Low settings sound smoother; higher settings can add a tonal peak, definition or synthetic resonance.
ENV AMT↗ Sets the depth and direction of cutoff movement from the FILTER envelope. The centre position has no envelope modulation; positive and negative settings move the cutoff in opposite directions.
LP / HP / BP↗ Selects Low Pass, High Pass or Band Pass filtering. Use LP for warmth, HP to thin a sound or BP for resonant percussion. ENV AMT and the SCULPT FILTER envelope can animate the chosen filter.
FIG 05FILTER: cutoff, resonance, envelope amount and filter type.
SCULPT — amplitude, filter and pitch envelopes↗
The SCULPT display changes with the selected target. AMP and FILTER each offer Attack, Decay, Sustain and Release (A/D/S/R). PITCH instead uses Amount, Decay and Curve (A/D/C). These stages determine how the sound evolves after every trigger.
AMP — control the hit’s volume shape↗
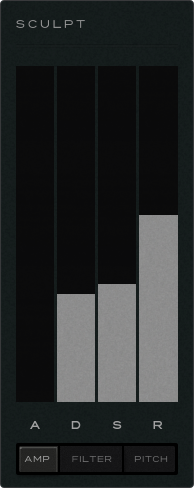
A — ATTACK↗ Sets how quickly the sound reaches its peak. Very short settings deliver immediate impact; longer settings soften the leading edge.
D — DECAY↗ Sets the fall from the initial peak towards sustain. Short settings tighten the kick; longer settings preserve more of its initial weight.
S — SUSTAIN↗ Sets the level maintained after decay while the envelope remains active. Lower settings let the body fall away more completely; higher settings retain more volume.
R — RELEASE↗ Controls the final fade after the release stage begins. Short release sounds abrupt; longer release allows the remaining signal to trail off more gradually.
FIG 06SCULPT / AMP: A, D, S and R govern loudness over time.
FILTER — shape the movement of the cutoff↗
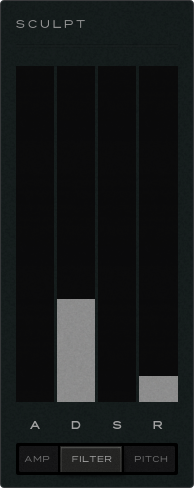
A — ATTACK↗ Controls the rise of the filter envelope. A short attack places the tonal change near the hit’s beginning; a longer attack delays its peak.
D — DECAY↗ Sets how quickly filter movement falls from its peak toward sustain. Short decay makes the attack and body sound more distinct.
S — SUSTAIN↗ Sets the filter envelope level after decay. The actual cutoff change depends on ENV AMT, including whether the modulation is positive or negative.
R — RELEASE↗ Sets how quickly the filter envelope returns toward its resting state during release. The sound of this stage depends on how much amplitude remains.
FIG 07SCULPT / FILTER: a separate four-stage envelope for timbral movement.
PITCH — create the kick’s downward sweep↗
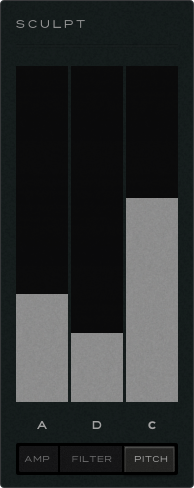
A — AMOUNT↗ Sets how far above the base pitch the sweep begins, from no movement up to 48 semitones. Small movements add thump; larger movements create dramatic electronic attacks.
D — DECAY↗ Sets how quickly the pitch returns to the base frequency, from about 5 to 500 milliseconds. Short values feel punchy; longer values make the downward bend more audible.
C — CURVE↗ Changes the shape of the descent without changing the sweep amount. Use it to fine-tune whether more of the pitch change is heard early or later in the decay.
FIG 08SCULPT / PITCH: Amount, Decay and Curve (A/D/C).
DIRT — transient weight and harmonic character↗
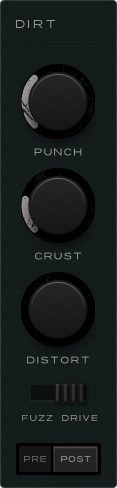
PUNCH↗ Boosts the initial transient after the main filtering and dirt stages. It adds definition without significantly extending the tail and works independently of PRE / POST.
CRUST↗ Introduces digital degradation through progressively stronger quantisation and sample holding. Subtle settings add grain; heavier settings become rough, coarse and lo-fi.
DISTORT↗ Adjusts whichever distortion character is selected for editing. Low levels provide light harmonic colour; higher levels give denser and more aggressive distortion. FUZZ and DRIVE can both be active at once.
FUZZ / DRIVE↗ Selects the distortion amount controlled by DISTORT rather than forcing only one character to play. FUZZ is the more heavily coloured path; DRIVE adds saturation. They retain separate values and may be combined: FUZZ feeds DRIVE in the dual dirt chain, producing richer, more complex harmonics.
PRE / POST↗ Places the dirt chain before or after the filter and amplitude shaping. PRE allows the filter to tame added harmonics; POST keeps more of the distorted edge after filtering.
FIG 09DIRT: PUNCH, CRUST and combinable FUZZ/DRIVE character processing.
MASTER — final balance and placement↗
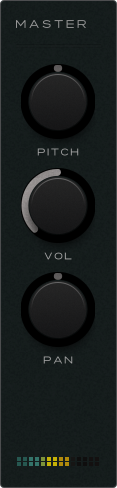
PITCH↗ Shifts the selected voice’s tuning from −12 to +12 semitones. Unlike the PITCH envelope, this changes the overall pitch; sequencer per-step pitch edits can add another layer of variation.
VOL↗ Sets the selected voice’s output level without changing the level of the whole kit. Adjust after adding distortion or layers to restore a balanced mix.
PAN↗ Moves the voice between the left and right channels. The centre position is often a useful starting point for kicks, while more extreme settings suit experimental stereo placement.
OUTPUT METER↗ Shows DRUMR’s combined output after master processing, rather than acting as a dedicated meter for the selected drum. Use it with the global VOL control to check overall level.
FIG 10MASTER: per-voice pitch, level and pan, plus the combined output meter.
TEXTURE — combine samples with synthesis↗
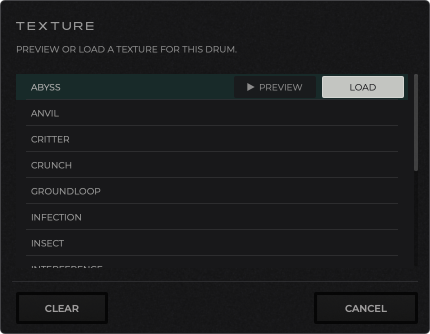
BROWSE↗ Open TEXTURE to browse compatible factory or user audio files. DRUMR supports WAV, AIFF/AIF and FLAC textures on Kick, Snare and Toms.
PREVIEW↗ Auditions an available texture before it is loaded, helping you evaluate its attack, grit or mechanical character.
LOAD↗ Assigns the chosen audio texture to the drum. Once present, the corresponding BLEND control determines how strongly it contributes.
CLEAR / CANCEL↗ CLEAR removes the texture selection without deleting the underlying audio file. CANCEL closes the browser without completing another selection.
FIG 11TEXTURE browser: audition, load and clear a source file.
External texture audio is referenced by the patch or session rather than embedded in the plugin state. Keep user texture files available when moving projects between computers.
SCAVENGER AUDIO / THE DRUMR FIELD GUIDE
CHAPTER 04 / USER GUIDEThe nine voices: what changes
04Every DRUMR voice uses the same general approach to shaping a hit, but some voices provide their own synthesis or filtering tools.
Kick and Tom 1–3 share the oscillator, texture, pitch envelope and dirt approach described in chapter 03. The following pages concentrate on the differences that matter when editing Snare, Hats, Crash and Clap. Unless noted otherwise, BLEND, SCULPT, DIRT and MASTER behave as described in the Kick reference.
SNARE — tuned body, noise and separate filtering↗
OSCILLATOR 1↗ Provides the snare’s main pitched body. Choose SAW, SIN, SQR or TRI and adjust its frequency. Smooth waveforms favour a rounder body; more harmonically rich shapes support sharp electronic snare sounds.
OSCILLATOR 2↗ Layers another pitched element or drives oscillator FM. Close tuning reinforces body; contrasting pitches make the snare more inharmonic. Its FM role is independent of its direct blend level.
NOISE↗ WHITE gives a bright, crisp snare-wire or snap character; PINK gives a softer, darker texture; LOOP uses prepared repeating noise for more repeatable, synthetic rattles and attacks.
TEXTURE↗ Loads an external sample texture into the snare source. Useful for recorded rattles, mechanical hits and acoustic details; set its contribution in BLEND.
HARD SYNC↗ Restarts OSC 2 as OSC 1 completes a cycle, introducing a sharper or more synthetic tonal response.
FM↗ Controls either oscillator modulation or noise modulation according to the OSC / NOISE selector. Oscillator FM adds pitched harmonic complexity; noise FM adds rougher, more irregular texture and is linked to the snare’s wire character.
OSC / NOISE↗ Changes which FM amount is being edited. Both amounts are stored separately, so you can move between a tuned buzz and a noisy snare-wire character without losing either setting.
FIG 12Snare SOUND SOURCES: including WHITE, PINK and LOOP noise.
Snare FILTER — MIX, OSC and NZ↗
The Snare adds a TARGET selector so its pitched and noisy ingredients can have independently retained filter settings. This is useful for preserving a full low-mid body while cleaning up, brightening or narrowing the noise component.
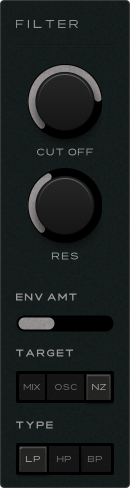
CUT OFF↗ Sets the cutoff of the currently targeted filter. Use a lower oscillator cutoff for a rounder body or a higher noise cutoff to keep crisp snare-wire attack.
RES↗ Emphasises frequencies close to the selected filter’s cutoff, from gentle definition to a more focused tonal or noise-band peak.
ENV AMT↗ Sets the bipolar depth of filter envelope modulation. The centre position is neutral; positive and negative settings move cutoff in opposite directions.
TARGET: MIX / OSC / NZ↗ MIX edits the shared filter controls; OSC edits dedicated oscillator filtering; NZ edits dedicated noise filtering. The oscillator and noise settings are retained separately, allowing focused adjustment without overwriting the other stored settings.
TYPE: LP / HP / BP↗ Choose Low Pass, High Pass or Band Pass for the currently targeted section. For example, low-pass the oscillator body and high-pass the noise to keep snap without unnecessary bass.
FIG 13Snare FILTER: shared, oscillator-specific and noise-specific shaping.
HH, HH OPEN and CRASH — cymbal sound sources↗
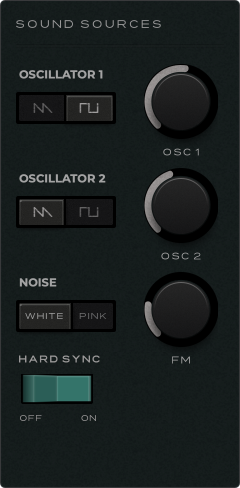
OSCILLATOR 1↗ Supplies a pitched source for cymbal harmonics. Choose SAW for a rich buzz or SQR for a more hollow, angular tone; use OSC 1 to tune it.
OSCILLATOR 2↗ Adds a second pitched source and provides the oscillator-FM signal. Deliberately mismatched pitches can create complex, clangorous partial relationships.
NOISE↗ Select WHITE for bright hiss, sizzle or splash, or PINK for a softer and darker noise contribution. Balance its level in BLEND.
HARD SYNC↗ Restarts OSC 2 relative to OSC 1, creating sharper and more tightly coupled harmonics when enabled.
FM↗ Uses OSC 2 to modulate OSC 1. Small amounts create subtle metallic edge; stronger settings yield buzzy, aggressive and inharmonic sounds. Hats and Crash do not expose the OSC / NOISE FM selector.
FIG 14Shared HH / HH Open / Crash SOURCES: two oscillator waveforms and oscillator FM.
TIMBRE — metallic partials and OLD / NEW modes↗
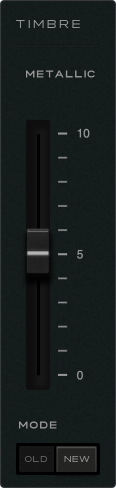
METALLIC↗ Sets the prominence of DRUMR’s dedicated cluster of inharmonic metallic components. Lower amounts let noise and the conventional oscillators dominate; higher amounts bring more clang and complex partials. Its character also changes with the selected synthesis mode.
OLD↗ The brighter, sharper cymbal character. Its pronounced “tss” attack evokes classic electronic and early analogue drum-machine hats; useful when the sound needs to cut through a mix.
NEW↗ A somewhat darker, clangier attack, arguably closer to a real metallic hat or cymbal. Its newer synthesis path separates the attack, metallic body, tonal body and tail, giving them distinct internal shaping.
MODE↗ Switch OLD / NEW to compare two different synthesis characters using the same voice controls. Neither is objectively better: choose OLD for sharper hiss and NEW for a more resonant, clang-like response.
FIG 15TIMBRE: metallic content and the bright OLD / clangier NEW character.
HH OPEN — choke behaviour↗
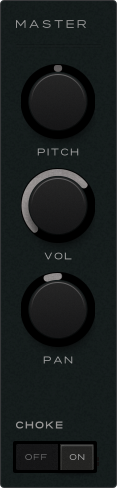
CHOKE: ON↗ Allows a triggered closed hat to stop the currently ringing open-hat voice, helping produce a tight, believable interaction between the two hats.
CHOKE: OFF↗ Lets the open hat continue according to its envelope, even when the closed hat is struck. Useful for long washes or deliberately overlapping electronic patterns.
FIG 16HH Open CHOKE: closed-hat interaction on or off.
How to use the three cymbal voices↗
HH (Closed Hi-Hat) — Choose a fast amplitude envelope and a focused balance of noise and metallic partials for precise ticks and crisp repeated hats. More FM can introduce industrial bite.
HH Open — Extend the envelope so the metallic body and noise can develop. Use CHOKE ON for natural closed/open interplay, or OFF for overlapping tails.
Crash — Longer decay and release let the metallic components and noise wash develop. Compare OLD for a brighter splash and NEW for a darker, clangier attack.
CLAP — four bursts, body and ringing tone↗
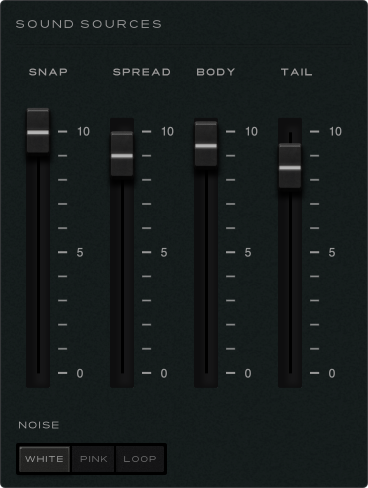
SNAP↗ Controls the sharpness and impact of the initial clap bursts. Lower settings give a broader, softer hit with more overlap; higher settings make the attack faster, tighter and more pronounced, adding a brighter crack.
SPREAD↗ Sets the timing between the clap’s four bursts. Low values bunch them into a compact hit; higher values separate them for a group-clap or flam-like effect. This changes timing, not stereo width.
BODY↗ Adds oscillator-derived weight beneath the noise clap. Increasing BODY gives a fuller, thicker and slightly darker low-mid sound; lowering it produces a lighter, more noise-focused clap.
TAIL↗ Sets the prominence of the bright, filtered noise that follows the main hit. Low settings sound dry and abrupt; high settings add air and trailing grit. The AMP envelope still governs the overall duration.
NOISE↗ WHITE, PINK and LOOP offer different noise characters for the clap’s bursts and tail. Choose a brighter, softer or more repeatable noise texture, then shape the result with the other clap controls.
FIG 17Clap SOURCES: SNAP, SPREAD, BODY, TAIL and selectable noise.
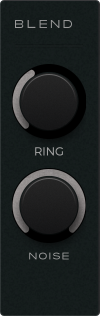
RING↗ Sets the level of a pitched oscillator in the clap’s body. Higher values add resonant or metallic tone, moving toward electronic or bell-like percussion; low values keep the clap drier and more noise-based. The ringing component follows the clap’s pitch and envelope rather than acting as a separate effect.
FIG 18Clap BLEND: RING increases the pitched component.
TOM 1, TOM 2 and TOM 3 — a related family↗
All three Toms use the Kick-style oscillator and noise engine, texture loading, filter and sculpt controls. They also support the OSC / NOISE FM selector and the combinable FUZZ / DRIVE dirt characters. Rather than introducing different control names, the three voices give you independently tunable sources for high, mid and low drum parts.
A musical starting point is to tune Tom 1 higher than Tom 2, and Tom 2 higher than Tom 3. Increase the PITCH sweep amount for more pronounced attack, use FILTER to darken the body and vary per-step pitch in the sequencer to turn a fill into a melodic phrase.
Nine-voice summary↗
| VOICES | DISTINCTIVE SOUND-DESIGN OPTIONS |
|---|---|
| Kick | Two oscillators, noise, texture, selectable FM source, pitch envelope and layered dirt. |
| Snare | WHITE / PINK / LOOP noise, selectable FM source and MIX / OSC / NZ filtering. |
| HH | SAW / SQR oscillators, metallic partials, OLD / NEW cymbal modes. |
| HH Open | Shared hat engine, longer-tail possibilities and CHOKE OFF / ON. |
| Clap | SNAP, SPREAD, BODY, TAIL, RING and WHITE / PINK / LOOP noise. |
| Tom 1 | Kick-style synthesis, texture and FM; independently tuneable higher tom. |
| Tom 2 | Kick-style synthesis, texture and FM; independently tuneable middle tom. |
| Tom 3 | Kick-style synthesis, texture and FM; independently tuneable lower tom. |
| Crash | Shared cymbal engine with METALLIC and OLD / NEW modes. |
SCAVENGER AUDIO / THE DRUMR FIELD GUIDE
CHAPTER 05 / BUILDING RHYTHMSGIVE IT A PULSE.
05The sequencer is designed for quick pattern entry and detailed per-hit edits.
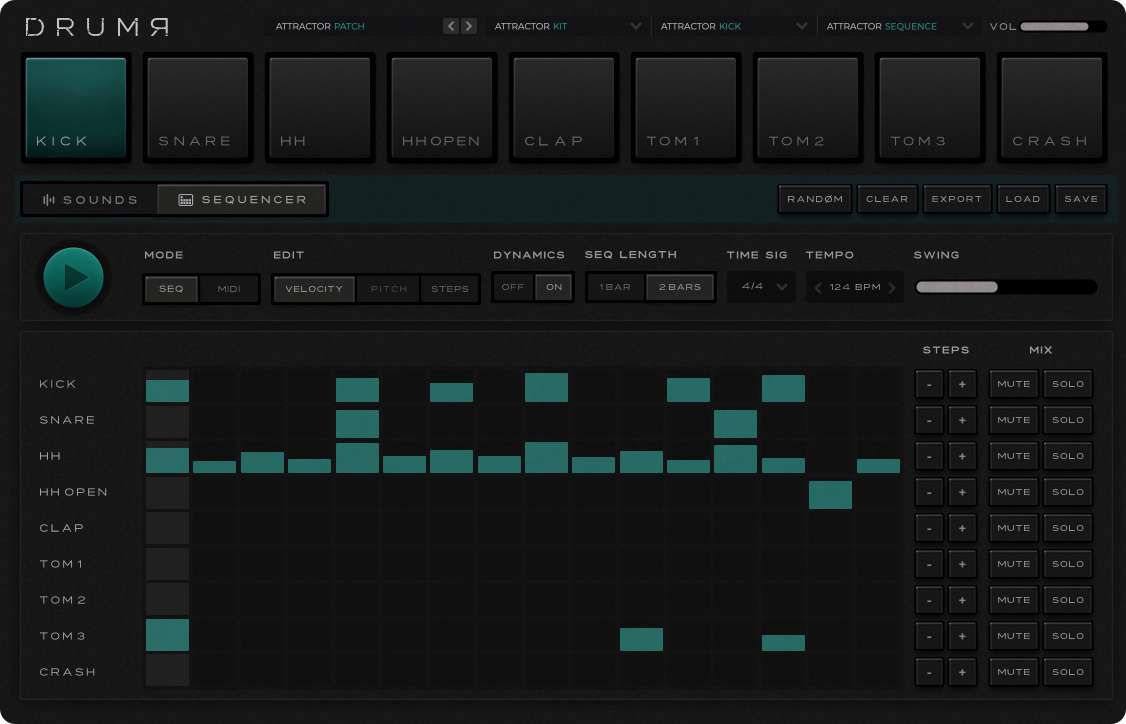
Lanes, steps and bars↗
There are nine drum lanes, one for each pad. In 4/4 there are 16 steps per bar. The number of steps follows the selected time signature: for example, 6/8 uses 12, 12/8 uses 24 and 7/8 uses 28 steps per bar. Patterns can contain one or two bars; the editor shows one bar at a time and follows the playhead.
Each lane has its own cycle LENGTH control and MUTE and SOLO controls. Multiple lanes may be soloed at once. A lane can use fewer steps than the overall pattern, making polyrhythmic-style interactions possible.
Enter and edit notes↗
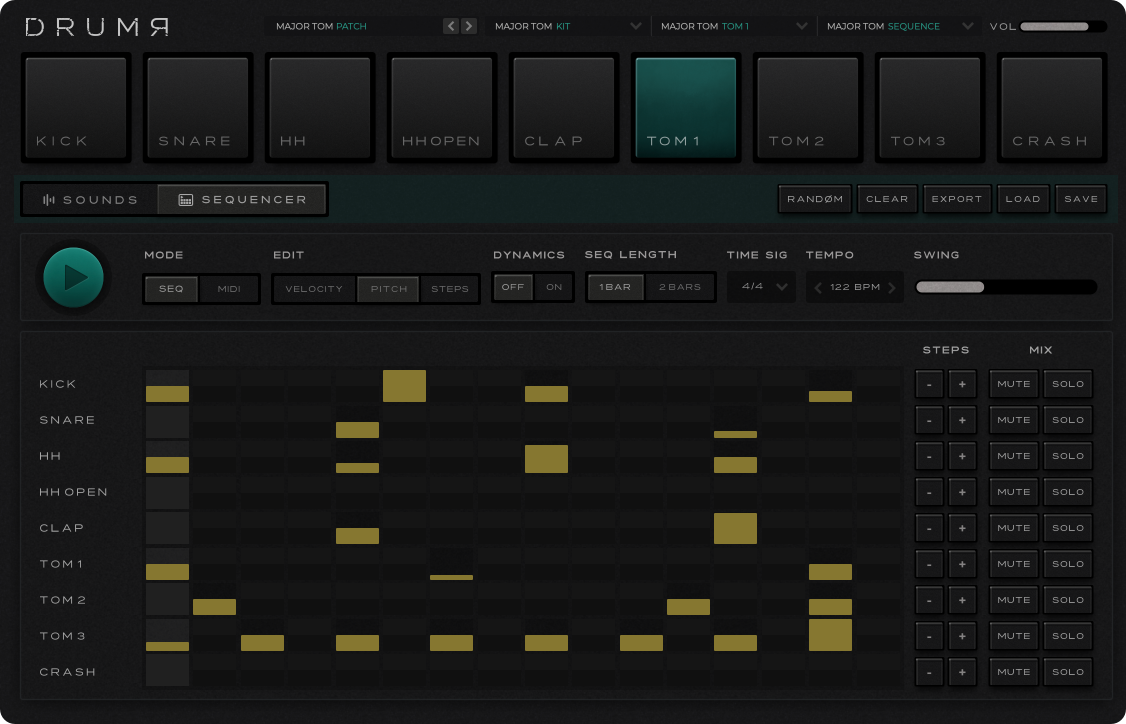
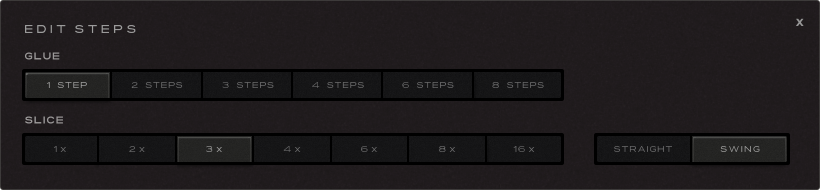
Step editing: Add ratcheting, tuplets, stutters and subdivisions by slicing and gluing steps.↗
In STEPS mode, choose SLICE to subdivide a hit into 1×, 2×, 3×, 4×, 6×, 8× or 16× events. GLUE joins 1, 2, 3, 4, 6 or 8 steps where there is room. STRAIGHT / SWING changes a roll’s timing feel. Roll settings are saved in your patterns, but they are not exposed as separate DAW automation parameters.
Per-step pitch limits↗
| Drum | Step pitch range |
|---|---|
| Kick | ±12 semitones |
| Snare | ±5 semitones |
| HH / HH Open / Crash | ±2.5 semitones |
| Clap | ±4 semitones |
| Tom 1 / 2 / 3 | ±8 semitones |
SCAVENGER AUDIO / THE DRUMR FIELD GUIDE
CHAPTER 06 / USER GUIDETiming, dynamics and playback
06Choose whether DRUMR follows your DAW or runs from its own internal clock.
Host and internal transport↗
In SEQ mode, DRUMR follows host transport and host timing when the DAW provides it. You can also start internal playback when the host is not playing and the internal play control is available. The internal play control is not offered in MIDI trigger mode or while the DAW transport is running.
The TIME/TEMPO setting spans 40–240 BPM when DRUMR is providing its own clock. The selectable internal time signatures are 4/4, 3/4, 6/8, 2/4, 12/8, 5/4 and 7/8. Note that some hosts may impose their own time signature or timing behaviour.
SWING↗
SWING creates a musical, more human-feeling groove by moving selected subdivisions away from perfectly straight timing. Different drum voices can be offset by different amounts rather than every hit shifting uniformly, helping kicks, snares, hats and percussion sit naturally together. The straight-time reference is centred internally; check the visible knob position against your installed build and current preset. The result also depends on the time signature and the pattern itself.
DYNAMICS↗
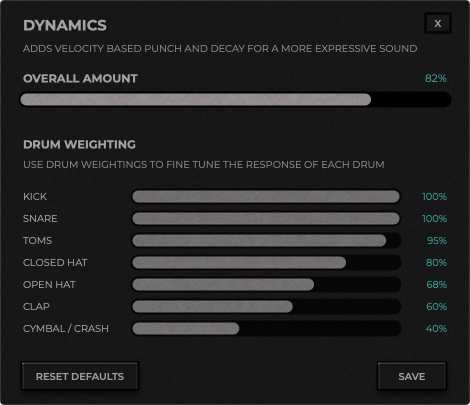
DYNAMICS ON introduces kit-wide velocity shaping. The settings view includes an overall amount and individual weightings for different drum groups. This makes the pattern respond with more musical emphasis while preserving your authored step velocities.
MUTATE, RANDOM and CLEAR↗
MUTATE introduces a variation of the selected drum sound; its hold/release gesture increases the strength of the change. The nearby reset action recalls the stored drum. RANDOM generates pattern content and CLEAR removes steps from the relevant visible bar. Save a favourite version before experimenting extensively.
MUTATE — press, hold and release
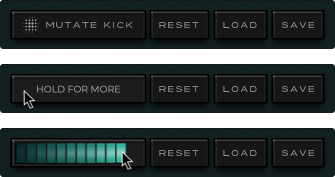
MUTATE progressively strengthens the variation while held.
RANDOM and CLEAR

RANDOM regenerates the pattern; CLEAR resets the relevant visible bar.
SCAVENGER AUDIO / THE DRUMR FIELD GUIDE
CHAPTER 07 / USER GUIDEPresets and textures
07Save an entire composition, only the kit or individual drum voices or just the sequence itself.
Four kinds of asset↗
| Asset | What it contains | Use it when… |
|---|---|---|
| PATCH | Combined kit and sequence state | You want a complete sound and rhythm ready to recall. |
| KIT | Nine drum sounds | You want to swap an entire palette of percussion. |
| DRUM | One voice’s sound | You want to reuse a great Kick or Snare in another kit. |
| SEQUENCE | Pattern and rhythm data | You want to try the same beat with a different kit. |
DRUMR has a factory browser and a user library. The inspected source includes 38 visible curated factory patches, plus a separate hidden asset used to construct INIT. INIT is a saved starting state, not necessarily an empty pattern or the engine’s underlying factory defaults.
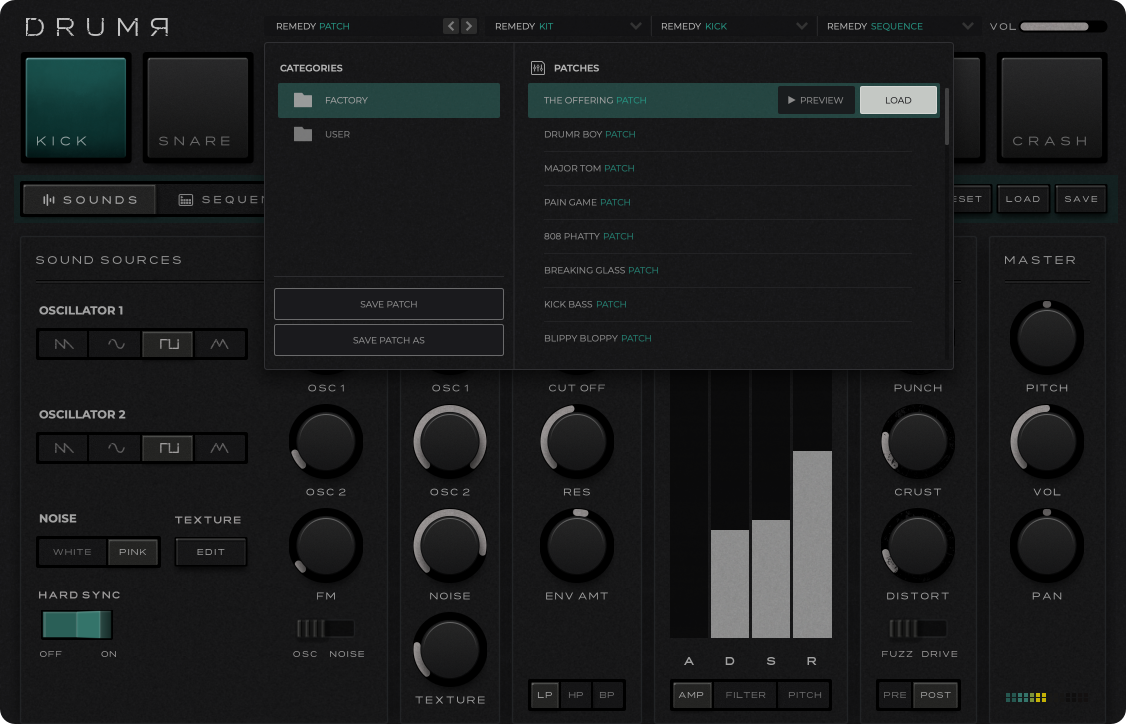
Saving and loading↗
Native file formats are .drumrpreset (patch), .drumrkit (kit), .drum (voice) and .drumrseq (sequence). Some older voice file formats are also accepted. AU hosts may additionally use .aupreset files.
Loading external textures↗
Kick, Snare and the three Toms can load external WAV, AIFF/AIF or FLAC files. Select the voice, use TEXTURE LOAD to select a file, then adjust its blend amount. After a texture has loaded, the control changes to EDIT, where you can replace or clear the source.
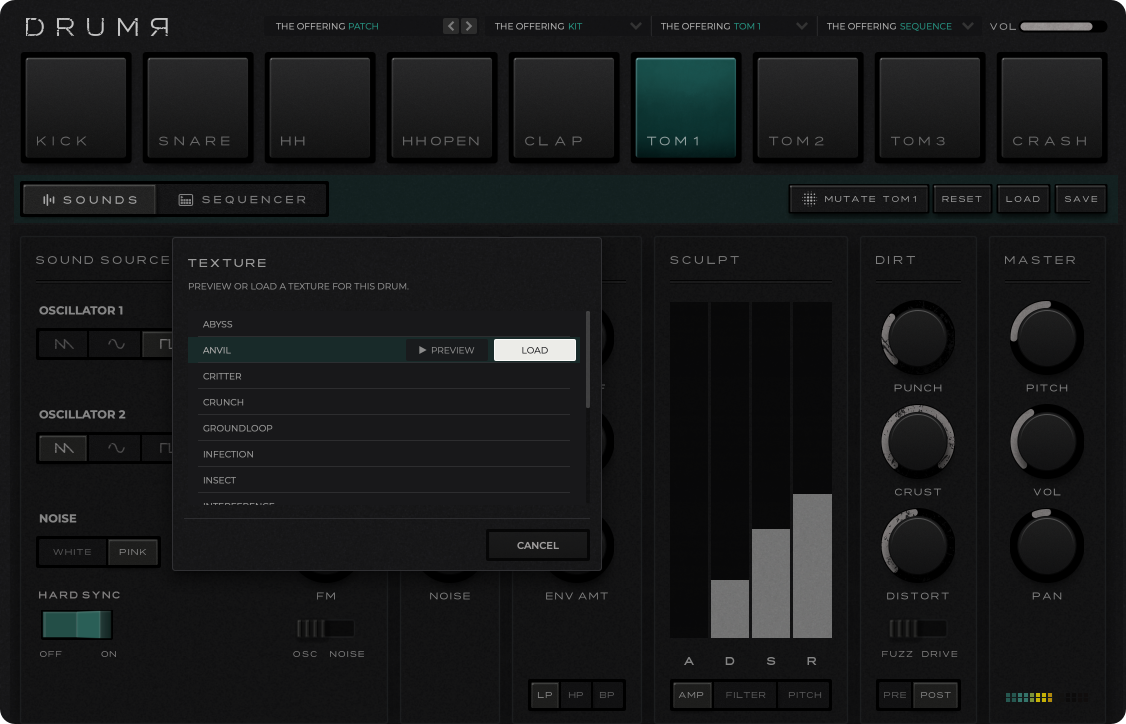
The package is designed to include a selection of factory texture WAV files. Custom texture files are separate resources: keep them available if you move a project or preset to another computer.
SCAVENGER AUDIO / THE DRUMR FIELD GUIDE
CHAPTER 08 / USER GUIDEExporting your work
08Turn a DRUMR pattern into audio or MIDI files for editing and mixing elsewhere.
Choose an export format↗
| Format | What you receive | Useful for |
|---|---|---|
| MIDI (.mid) | Pattern notes with mapped drum numbers, velocities, rolls and rhythmic timing. | Rearranging the groove in a DAW or feeding another instrument. |
| Stereo WAV | A rendered stereo pattern with a tail, 24-bit at the default 44.1 kHz render rate. | Quick loops, arranging and sending audio. |
| WAV stems | Individual rendered WAV files for active/eligible drum lanes. | Mixing drums independently, processing each sound separately. |
Use EXPORT and select the desired audio/MIDI choice. The renderer uses the stored one- or two-bar pattern and includes a tail for audio. MIDI export carries the pattern, not the synthesis engine or the audio texture files.
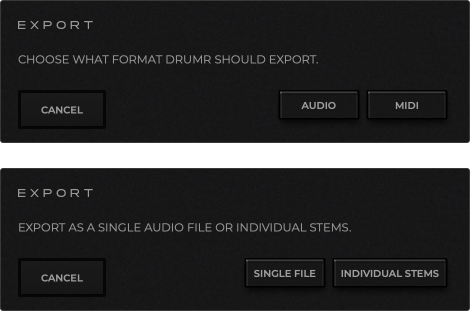
Before exporting↗
• Check MUTE and SOLO settings: they influence which lanes are included in an audio stem export.
• Confirm the intended time signature, one/two-bar length and tempo.
• Listen to the opening and ending of the exported audio in your DAW; rendered alignment and host-specific tempo interpretation still need release testing.
SCAVENGER AUDIO / THE DRUMR FIELD GUIDE
CHAPTER 09 / USER GUIDEMIDI, DAWs and automation
09Trigger DRUMR like a drum instrument, or sequence it internally and automate many of its sound controls.
MIDI note map↗
| Voice | MIDI note | Common label* |
|---|---|---|
| Kick | 36 | C2 |
| Snare | 38 | D2 |
| HH | 42 | F#2 |
| HH Open | 46 | A#2 |
| Clap | 39 | D#2 |
| Tom 1 | 45 | A2 |
| Tom 2 | 43 | G2 |
| Tom 3 | 41 | F2 |
| Crash | 49 | C#3 |
Throughout the guide, capitalised words indicate labels in DRUMR’s interface. Some controls, options and playback behaviour depend on the selected voice, mode and DAW.
SEQ mode versus MIDI mode↗
In SEQ mode, the internal rhythm is the sound source and incoming MIDI is not used as live drum triggers. In MIDI mode, incoming mapped MIDI notes trigger the matching voices using note velocity. Do not assume DRUMR sends a live stream of sequencer notes to your DAW: the documented way to obtain pattern MIDI is EXPORT.
DAW automation↗
Host automation is registered for master controls, individual voice synthesis and mix parameters, lane controls and each stored step’s on/off, velocity and pitch. Some parameters are contextual and may appear in a host’s list even if they are not visible on the selected voice.
Not every interface action is a host automation parameter. Examples that are saved or operated through other mechanisms include file browsing, loaded texture file paths, time-signature selection, pattern bar count, roll settings and licensing actions. DRUMR does not document a built-in MIDI-learn workflow.
Audio and plugin formats↗
The macOS project includes AU, VST3 and standalone targets. The audio processor has no audio input and one main mono or stereo output. It does not expose separate live outputs for Kick, Snare and other voices. Detailed support for specific macOS versions, DAWs and system configurations must be confirmed for the distributed installer.
SCAVENGER AUDIO / THE DRUMR FIELD GUIDE
CHAPTER 10 / USER GUIDEInstallation and licensing
10Install DRUMR, explore the trial, then activate your serial when you are ready.
macOS installation↗
Throughout the guide, capitalised words indicate labels in DRUMR’s interface. Some controls, options and playback behaviour depend on the selected voice, mode and DAW.
Trial mode↗
DRUMR provides a 30-day trial. While unlicensed, audio is muted for approximately two seconds every 75 seconds, and up to three patch saves are allowed during the trial. After trial expiry, output stays silent until authorised.
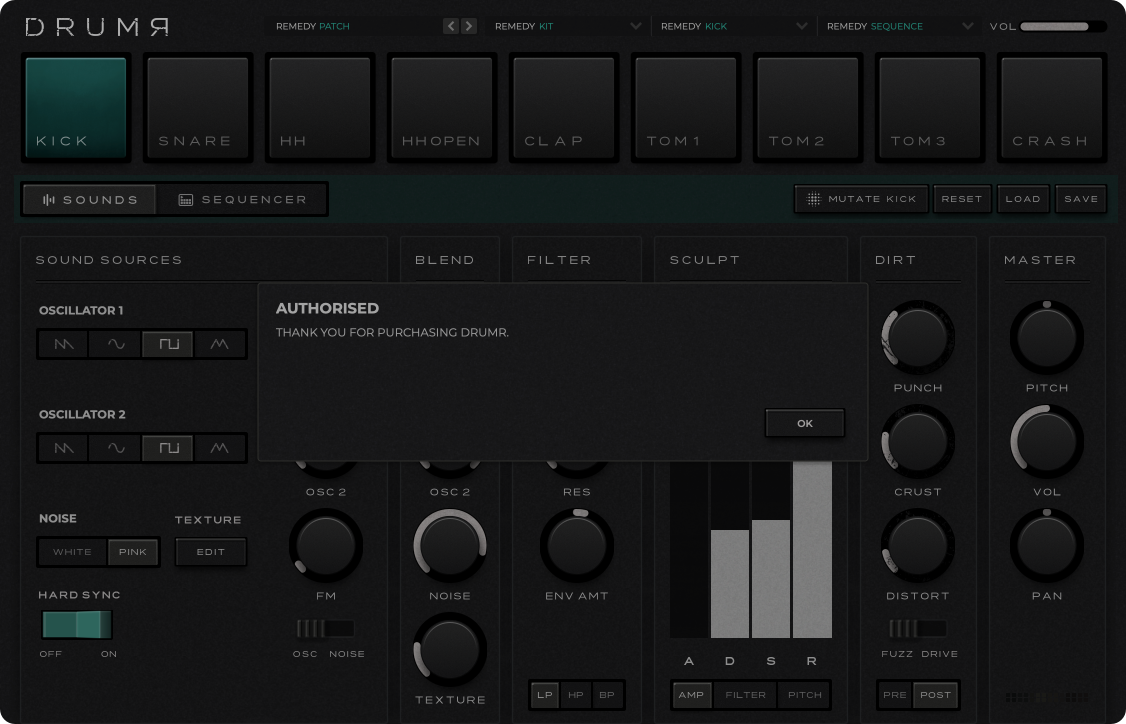
Serial activation and status↗
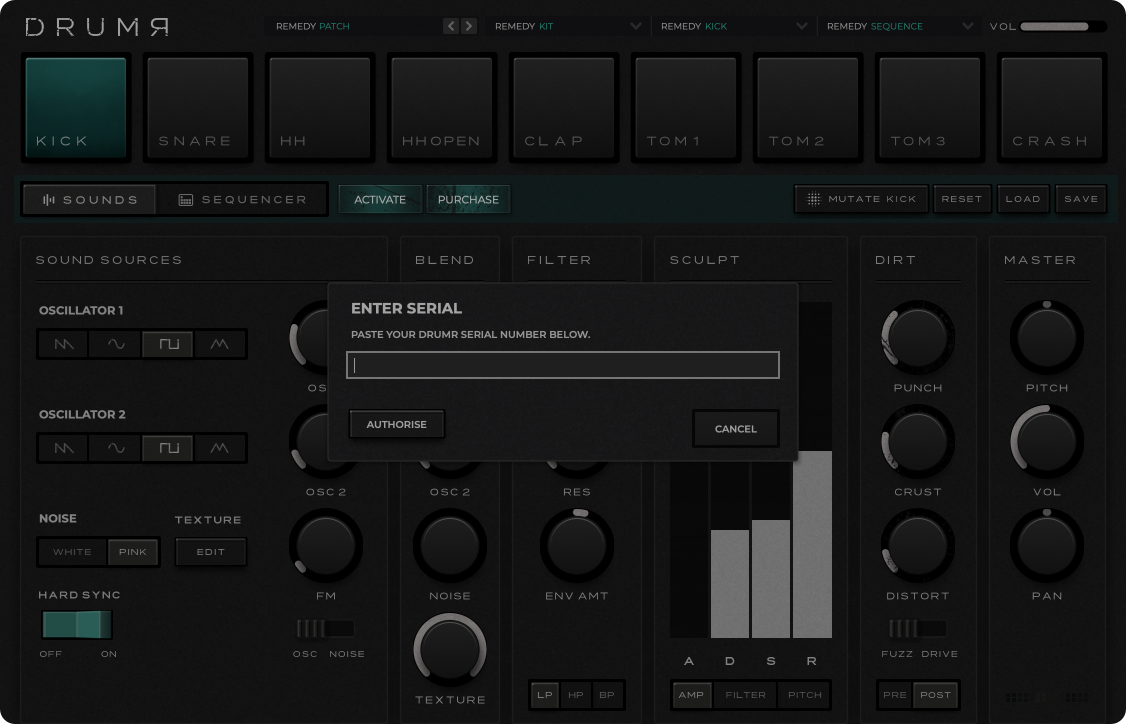
Activation uses your DRUMR serial number; this guide does not describe offline licence-file import. If your serial is rejected, double-check what was entered and use the support information provided with your purchase.
SCAVENGER AUDIO / THE DRUMR FIELD GUIDE
CHAPTER 11 / USER GUIDESound-design starting points
11These short recipes are ideas to explore, not guaranteed factory preset values. Adjust by ear and save any result worth keeping.
FIELD NOTES / CREATIVE EXERCISES
1. Solid electronic kick↗
Select Kick. Start with a prominent SIN oscillator, lower-frequency body and a fast downward PITCH sweep. Increase PUNCH for extra attack, then add modest PRE DRIVE for weight. Reduce the noise blend if the transient becomes too clicky.
2. Snare with separate body and wires↗
Select Snare. Blend a tonal oscillator body with a stronger noise source. Use the OSC / NOISE FM options to add texture, then target OSC and NZ filtering separately. Keep the oscillator branch full-bodied while high-passing some of the noise branch.
3. Tight closed hats and breathing open hats↗
Use the HH and HH Open voices. Explore NEW mode, adjust METAL and NOISE, then shorten the closed-hat amplitude shape. Enable CHOKE on HH Open and listen to the way a closed-hat hit interrupts its tail.
4. Wide, layered clap↗
Select Clap. Compare ROUND and TIGHT BODY, then BLUNT and SHARP SNAP. Increase SPREAD for more separated bursts. Use TAIL for the decay character and RING for additional pitched content.
5. Melodic tom fill↗
Tune Tom 1, Tom 2 and Tom 3 to contrasting pitches. Add a small pitch sweep for impact. In the sequencer, create a short run of tom hits and use per-step PITCH to add motion. Try a loaded texture if you want a more acoustic attack.
6. Industrial percussion loop↗
Build a sparse pattern and apply CRUST to one or two voices. Compare PRE versus POST dirt placement and introduce a short ROLL near the end of a bar. Turn DYNAMICS ON and vary step velocities for a less rigid result.
SCAVENGER AUDIO / THE DRUMR FIELD GUIDE
CHAPTER 12 / USER GUIDEQuick reference and troubleshooting
12A compact guide to key ranges, capabilities and common questions.
Selected parameter ranges↗
| Parameter | Range / choices |
|---|---|
| Internal tempo | 40–240 BPM |
| Time signatures | 4/4, 3/4, 6/8, 2/4, 12/8, 5/4, 7/8 |
| Sequence length | 1 or 2 bars; up to 28 steps per bar |
| OSC 1 frequency | Approximately 38–2,200 Hz |
| OSC 2 frequency | Approximately 32–3,000 Hz |
| Filter cutoff | Approximately 80 Hz–12 kHz |
| AMP / FILTER attack | Approximately 1 ms–2 s |
| AMP / FILTER decay and release | Approximately 1 ms–3 s |
| Voice tuning | ±12 semitones |
| Pitch sweep amount / time | 0–48 semitones / approximately 5–500 ms |
| Filter types | LP, HP, BP |
| Audio outputs | One main mono/stereo output |
Why do repeated hits sometimes cut off the previous tail?↗
Each of DRUMR’s nine voices has one live playback slot. Triggering the same voice again restarts it, while other voices can continue to play.
Why is there no sound when I play MIDI notes?↗
Check that the mode is MIDI, that your DAW sends notes to DRUMR, and that the notes match the MIDI numbers in chapter 9. Also check master volume and licence/trial status.
Why does my pattern not play when I press the internal play button?↗
The button is unavailable when DRUMR is in MIDI mode or the host transport is moving. Switch to SEQ mode, or start the DAW transport to run the pattern from the host.
Can I send each drum to a separate DAW output?↗
Not as live plugin output buses. Use EXPORT to create individual WAV stems for separate processing or mixing.
Why has a texture disappeared after reopening a project?↗
Texture audio is stored as an external file reference rather than embedded in the project. Check that the file still exists in the expected location; restore or reload it if needed.
Why is an exported MIDI groove not identical to the audio sound?↗
MIDI export carries rhythm, drum mapping and velocity, but not DRUMR’s synthesis settings or per-step pitch as MIDI note transposition. For the exact DRUMR sound, export audio.
Why does the plugin periodically go silent?↗
An unlicensed trial includes brief periodic silences; the expired trial is silent until activation. If DRUMR is already activated, inspect your audio and MIDI routing and the DAW track configuration.